Mammatus clouds and crepuscular rays over the Pacific Ocean.

"Mammatus clouds and crepuscular rays" © 2007 Brocken Inaglory

0

Why do we see different colors in Earth's sky at different times of day? After this activity, students will will be able to support an explanation for the colors we see in Earth’s sky with evidence from a scientific model.

Objectives

Students will be able to:

  1. Support an explanation for the colors we see in Earth’s sky with evidence from a model
  2. Critique a scientific model, including identifying its limitations
  3. Explain why we see different colors in Earth’s sky at different times of day.
Materials
  • A room that can get very dark (no windows to the outside, or windows that can be easily blacked out)
  • Sky Science slide deck
  • For Investigation Part 1: Lab set-up for each group, including:
    • 1 dropper or pipet
    • 1 spoon
    • 1 incandescent flashlight
    • 1 clear container filled with water (preferably rectangular, but could also use a drinking glass or graduated cylinder)
    • Black construction paper (to place underneath container)
    • Small beaker or cup of skim milk
    • Colored pencils (at least red, orange, yellow, blue)
  • Set of notebook pages (1 copy per student)
    • p. 1: Earth/Moon Notice & Wonder
    • p. 2: Sky in a bucket investigation
    • p. 3: Light vocab and explanation
    • p. 4: Plan an investigation
    • p. 5: NOAA sky diagram #1
    • p. 6: NOAA sky diagram #2
    • p. 7: Analogy map and final reflection
  • For Investigation Part 2 (any or all you have available):
    • Colored cellophane gels
    • Colored bulbs and lamps
    • Fluorescent bulbs and lamps
    • Additional clear containers in a variety of shapes
    • Additional types of milk (half & half, soy milk, nut milk, etc.)
    • LED lights of various colors
Teacher Prep
  1. Set up Sky Science slides.
     
  2. Print one set of notebook pages for each student.
     
  3. Prep set of lab materials for each group of 3-4 students.
     
  4. Arrange all “further investigation” materials in a separate location, to reveal later.
     
  5. Block out windows or other light sources if necessary.
     
  6. You may want to try the investigation yourself ahead of time to make sure that the room gets dark enough to see the effect of adding milk to the colors you observe.

Student Notebook Teacher Tip: The student pages for this activity were created to be part of a notebook wherein student thinking and work is collected, and designed to leave room for students to flexibly use the space around the prompts, diagrams, etc. These pages could be glued into students’ science notebooks in their entirety, or could be edited to make smaller data tables, prompts, and diagrams for students to glue in as they move through the lesson.

Introduction (10 minutes)
  1. Show the four images of the sky from the Earth and the Moon (Slide 1).
     
  2. Hand out notebook page 1 (Earth & Moon Notice & Wonder). Encourage students to write down their own observations and questions, then when they are ready, share with their table group or elbow partner.
     
  3. Remind students that there is no right answer at this point, that this is an opportunity to look closely at these images and only think about observations and questions, not explanations.
     
  4. After about 5 minutes of thinking and talking in small groups, invite volunteers to share what they wonder. Record these wonderings on the board in the form of questions. Paraphrase and confirm with students to make sure that you understand their questions.
     
  5. Introduce the focus question (Slide 2): Why do we see that colors we do in Earth’s sky?
    • Make note of any student wonders that were similar or encompassed by this question.
    • Indicate that some other wonders that students shared may also be answered as you investigate this question over the next few lessons.
       
  6. Acknowledge that it could be difficult to investigate this question since we can’t bring the sky into the classroom to manipulate it! For this reason, we are going to use a model, and consider what it can help us understand about the sky.
Part 1 - Carry out an Investigation (20 minutes)
  1. Put students into groups of 2-4.
     
  2. Hand out notebook page 2. Ask each student to write it down the focus question in the space provided.
     
  3. Using Slide 3, introduce the materials and steps of the initial investigation. You may want to demo shining the light through the water in different directions, and observing from below and above, as well as from the side and the end facing the light source.
     
  4. Give each group the materials for Investigation Part 1 (see Materials)
     
  5. Check in with each group briefly to make sure they have decided on roles and understand the task.
     
  6. Once groups are ready, turn off the lights and give groups 3-5 minutes to observe plain water only. (Note: if you are projecting the powerpoint slides, remember to turn off the projector to make the room fully dark)
     
  7. Once all groups have observed plain water, all groups should add skim milk to the water and stir. Give groups at least 5 minutes to observe with the lights off once they have completed this step.
     
  8. Encourage students to take notes in their notebooks about what they observe, using words and sketches to show what colors they saw in the bucket and where.
     
  9. Turn the lights on. Give students 3-5 minutes to finish up their notes and sketches now that they have more light.

Teacher Tip: Group work roles for investigation. It could be useful to have group members to choose roles, including: 1) Materials Manager to get and set-up materials; 2) Notetaker to make sure predictions and observations are recorded in at least one notebook; and a 3) Facilitator to read directions and manage the process. These can be rotating roles if students want to try something new in Part 3, below.

Part 2 - Reflect and Explain (10 minutes)
  1. Hand out page 3, which includes light vocabulary and concepts.
     
  2. Give groups this prompt to discuss:
    • Based on what you know about light and color, what do you think is happening to the light in the bucket?
       
  3. Remind them that in their discussions, they can draw on what they observed, their prior knowledge or experiences, and the vocabulary and information about light and color that they were just given on the handout.
     
  4. At the end of 10 minutes, each group should have decided on one explanation that they can all agree on, complete with evidence that supports it. Using this sentence frame may help students support their claim with evidence: “At first, we think _______________ because ______________.”
     
  5. Circulate to make sure all students are writing down their group’s explanation and evidence in their notebooks.
Part 3 - Plan and carry out an Investigation (30 minutes)
  1. Hand out notebook page 4.
  2. Tell students that their next task is to plan a new investigation in order to test their explanation:
    • Groups should decide on one thing to change in their model in order to test their explanation.
    • Possible things to change include:
      • Shape of the container
      • The type of milk in the water
      • The amount of milk in the water
      • The color of the light
    • Reveal the optional materials to students, so they know what materials they have available as they plan their investigation.
    • In addition to recording their plan in words and/or pictures, groups should be sure to make a prediction: Based on their current explanation, what effect do they predict this change to the model will have on what they observe?
       
  3.  Give groups about 10 minutes to plan, circulating to be sure everyone is recording plans and predictions in their notebooks.
     
  4. Once all groups have planned, made a prediction, and set up their new model, turn off the lights to test!
     
  5. Visit each group and ask open-ended questions about their test:
    • What change did you make to your model and why?
    • What do you notice?
    • Are your observations agreeing with your prediction?
    • What are you thinking now? What do you wonder?
       
  6. Some groups may move faster, so you may open it up to them to make another change to their models.
     
  7. When everyone has tested and discussed at least one change, turn the lights on.
     
  8. Give groups 3-5 minutes again with the lights on to record their observations and new thoughts and ask them to discuss with their group:
    • Based on what you observed, do you need to revise your explanation?
    • What are you wondering now?
    • What would you want to try next.
       
  9. Give these sentence frames to help them shape their thinking in their notebooks:
    • “Now, we think_________ because__________.”
    • “We confirmed our thinking because_________.”
    • “Now, I wonder…..
Part 4 - Lab Visit (5-10 minutes)
  1. Ask students to leave their investigation set-up as it is, and leave their notebooks on their table open to notes that help explain their plan, what they observed, and what they are thinking now.
     
  2. Give students directions for a “lab visit” or gallery walk:
    • Visit at least one neighboring lab table to see what they have been up to.
    • Look at their plan, set-up, observations, revised explanations, and questions.
    • After about 5 minutes, return to your own table and talk with your group about anything new you noticed, new ideas you have, or what you’re wondering now.
       
  3. Give students a moment to record a final thought in their notebook:
    • If you could continue this investigation with any materials (not just what you were limited to today), what would you want to try?
    • What question would you hope to answer?
       
  4. Clean-up lab materials before moving on to critiquing the model and closing steps.
Part 5 - Comparing and Critiquing the Model
  1. Remind students of the image on their first notebook page.
     
  2. Ask students to think individually about these questions before sharing with an elbow partner:
    • Which bucket (milky or plain water) is more like Earth’s sky? Milky.
    • Which bucket is more like the moon’s sky? Plain.
    • Why do you think that? Some possible answers: Earth has an atmosphere. Light interacts with the particles in the milky water, as it does with Earth’s atmosphere, so you can see the light passing through the milky water and lighting up the bucket, as the sun lights up the sky. In the plain water, the light passes through the water without interacting with many particles. Similarly, the moon’s sky stays dark because it doesn’t have a thick atmosphere like Earth. You can see the sun in the distance, and you notice it when it hits the flag or the astronaut, kind of like when it hits the side of the bucket or your hand.
       
  3. Ask for volunteers to share out their thoughts. Students will be ready to move on when most people agree that the milky bucket is more like Earth’s sky.
     
  4. Hand out page 5.
     
  5. Ask students to think individually about these questions before sharing with an elbow partner. You may want to remind them of the focus question, which should be written in their notebook: Why do we see the colors we do in Earth’s sky?
    • What do you think this diagram is intended to show?
    • How does it relate to the focus question?
    • How does it relate to our model?
       
  6. Ask for volunteers to share out their thoughts. Key ideas here are that the diagram is showing that different colors of light are scattered differently by Earth’s atmosphere. The diagram seems to be saying that blue and violet light are scattered more easily. Students may notice that this parallels their observation of the model, where the light passing all the way through the water was yellow, or orange. Students also might notice that in our model, the milky water takes the place of (or “represents”) Earth’s atmosphere, and light coming from the flashlight represents the sun’s rays in space.
     
  7. Hand out page 6.
     
  8. Ask students to think individually about these questions before sharing with an elbow partner.
    • What do you think this diagram is intended to show?
    • How does it relate to the focus question?
    • How does it relate to our model?
       
  9. Ask for volunteers to share out their thoughts. One key idea, again, is that the diagram is showing that different colors of light are scattered differently by Earth’s atmosphere. The diagram shows in a different way that blue and violet light are scattered more easily. It also includes in this representation the idea that the distance light passes through the atmosphere to reach us depends on our position on the Earth relative to the Sun, which changes as Earth rotates. When the sun has a direct path, the blue light is scattered by the atmosphere making the sky look blue, and we often think of the sun as looking yellow. As Earth rotates away from the sun, what we think of as the sun “setting,” the sunlight passes through more atmosphere, scattering more colors, including the reds, oranges, and yellows that we often see in the evening - and for the same reason in the morning as the sun is rising.
Final Reflections
  1. Hand out page 7 (analogy map). Acknowledge that the class was able to figure out a lot from the model of the sky in a bucket! Using the model made it possible to manipulate, make changes, and investigate in order to building understanding and answer the focus question. However, since the model isn’t the real thing, it also has limitations.
     
  2. Draw students' attention to the parts of the model that are listed in the first column of the analogy map, then to the parts of the real world that they represent.
     
  3. Define strengths and limitation:
    • Strengths: Ways that a part of the model is like the real thing, so that it represents the real world accurately.
    • Limitations: Ways that a part of the model is very different from the real thing, and doesn’t represent the real world well at all.
       
  4. Tell students to work in pairs to first decide whether they agree with the parts of the model listed, and what they represent (in the first three columns). Then work together to complete the empty boxes in the table, thinking about the strengths and limitations.
     
  5. If students finish quickly, encourage them to fill in another row to critique another part of the model. For example, they could add the fat content of the milk, if that’s something that they tested.
     
  6. Finally, have students flip over the handout, or turn to a clean page in their notebook to do a final reflection, individually, in their notebooks.
    • Rewrite the focus question at the top of the page: "Why do we see the colors we do in Earth's sky?"
    • Use this time to write your answer to this question. What are you thinking now?
       
  7. Students do not need to share this thinking, except with the teacher.

Optional Extension: An opinion essay prompt for further thinking can be found in the full lesson plan.

Background for Educators

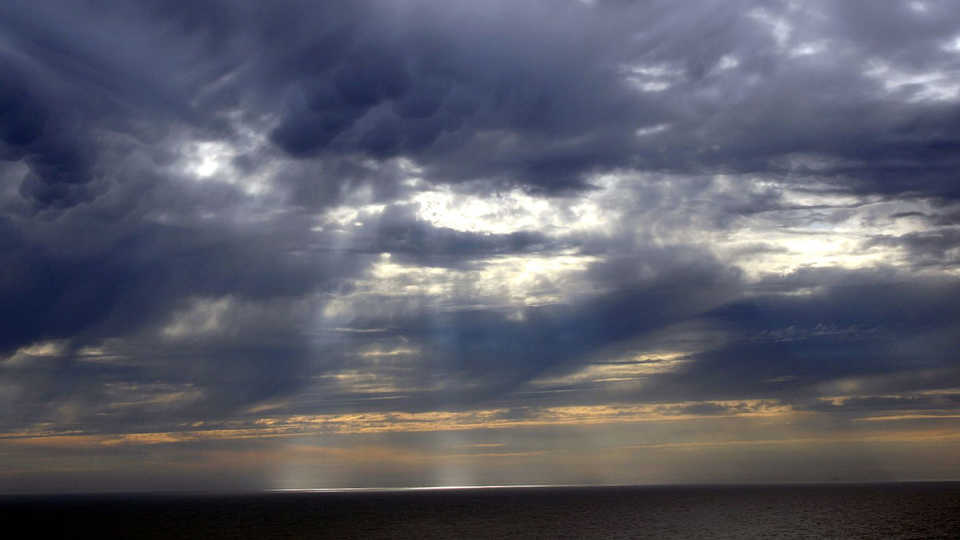
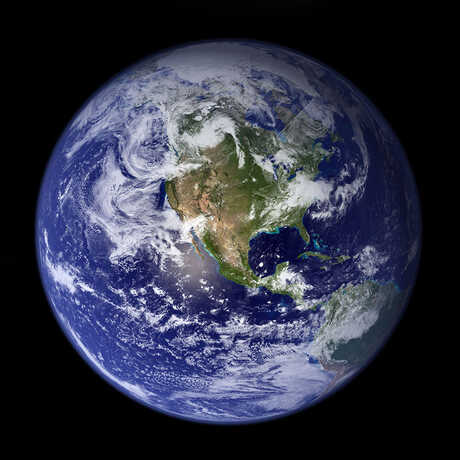
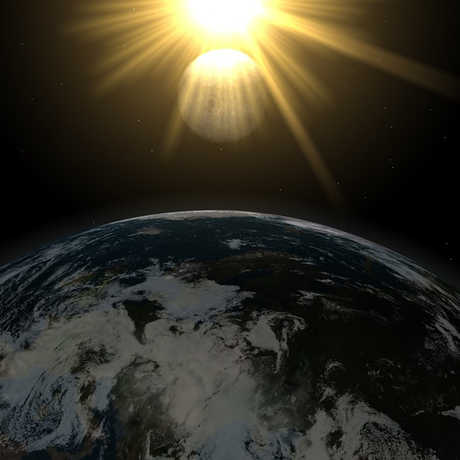
This activity is anchored in the phenomenon of the colors we see in Earth’s sky. The phenomenon is introduced through a selection of images that contrast the colors we see in Earth’s sky (at noon on a cloudless day, or at sunset) with images from the moon where the sun or sunlight is visible, but the sky remains black. The observations and questions that come out of this introduction help students connect to the focus question which guides the investigation: “Why do we see the colors we do in Earth’s sky?”

Investigating and critiquing a model

The goal of this activity is to build towards an answer to the above question by investigating and critiquing a physical model of the phenomenon that leads to the colors in Earth’s sky. Students have the opportunity to work with the model in three different ways. First, they follow step-by-step directions to create the basic model, adding skim milk to water and observing what happens to light as it passes through the milky water. This is the point where students are given some key ideas and vocabulary for talking about light and its interactions (transmit, reflect, refraction, and scatter), and asked to discuss and write a team explanation for what is happening to the light in the “bucket.” Based on this explanation, they are given a second opportunity to investigate this model by changing one thing that they think will test their explanation. Finally, students engage in critique of the model by comparing it to scientific diagrams, and identifying the limitations and strengths of the bucket model in representing the real phenomenon.

What can you expect to see in the bucket?

When you shine the flashlight through the water in the bucket, there are very few particles large enough for the light to interact with. Most of the light passes through without being reflected, absorbed, or scattered, traveling in a straight line from its source. Looking down on the water or in from the side you don’t see very much light and the bucket still looks dark. However, you can see the light when you look through the bucket towards the light source, shining brightly from the other side of the bucket.

After skim milk has been added, light is scattered by the larger particles that have been introduced to the water. Now when you look down into the bucket, more of this randomly scattered light reaches your eye, and instead of a dark bucket, you see a bucket filled with light. Much of the light looks white, but as you observe more closely, you may notice that different colors are more visible in locations closer to or further from the light source. 

How does this model the sky?

One phenomenon that the model helps us understand is that the sky viewed from the moon is dark, with a bright sun visible like a spotlight, while the sky viewed from Earth is filled with color. This model helps us consider how the Earth’s atmosphere causes a phenomenon we may take for granted.


Next Generation Science Standards

Science and Engineering Practices

  • Developing and Using Models:
    • Identify limitations of models. (3-5)
    • Collaboratively develop and/or revise a model based on evidence that shows the relationships among variables for frequent and regular occurring events. (3-5)
    • Develop and/or use models to describe and/or predict phenomena. (3-5)
    • Use a model to test cause and effect relationships or interactions concerning the functioning of a natural or designed system. (3-5)
    • Develop and/or revise a model to show the relationships among variables, including those that are not observable but predict observable phenomena
    • Develop a model to describe unobservable mechanisms. (6-8)
    • Develop and/or use a model to generate data to test ideas about phenomena in natural or designed systems, including those representing inputs and outputs, and those at unobservable scales. (6-8)

Disciplinary Core Ideas

  • PS4.B: Electromagnetic Radiation (4-PS4-2)
    • An object can be seen when light reflected from its surface enters the eyes.
  • PS4.B: Electromagnetic Radiation (MS-PS4-2)
    • When light shines on an object, it is reflected, absorbed, or transmitted through the object, depending on the object’s material and the frequency (color) of the light.
    • The path that light travels can be traced as straight lines, except at surfaces between different transparent materials (e.g., air and water, air and glass) where the light path bends.
    • A wave model of light is useful for explaining brightness, color, and the frequency-dependent bending of light at a surface between media.
    • However, because light can travel through space, it cannot be a matter wave, like sound or water waves.

Crosscutting Concepts

  • Cause and Effect:
    • Cause and effect relationships may be used to predict phenomena in natural or designed systems.
    • In grades 3-5, students routinely identify and test causal relationships and use these relationships to explain change. They understand events that occur together with regularity might or might not signify a cause and effect relationship.
References

Augustine, J. & Smith, L. (n.d.). Red sky in morning, sailor take warning. Red sky at night, sailor’s delight. National Oceanic and Atmospheric Administration (NOAA) Earth System Research Laboratory, Global Monitoring Division. Retrieved from: http://www.esrl.noaa.gov/gmd/grad/about/redsky/

Blue Sky from Exploratorium Science Snacks. Retrieved from: http://www.exploratorium.edu/snacks/blue-sky

Light waves and color (n.d.) on The Physics Classroom. Retrieved from: http://www.physicsclassroom.com/class/light/Lesson-2/Light-Absorption,-Reflection,-and-Transmission

Rayleigh scattering (n.d.) on Hyperphysics. Retrieved from: http://hyperphysics.phy-astr.gsu.edu/hbase/atmos/blusky.html#c2

Image: "Mammatus clouds and crepuscular rays" by Brocken Inaglory, licensed and modified under CC BY-SA 3.0; originally sourced from https://commons.wikimedia.org/wiki/File:Mammatus_clouds_and_crepuscular_rays.JPG

Appropriate for: 4th Grade - 8th Grade
Standards for: 4th Grade, 5th Grade, 6th Grade, 7th Grade, 8th Grade
Prep Time: 20 minutes
Activity Time: 120 minutes
Subjects: Developing & Using Models, Earth & Space Science, Physical Science, Systems & System Models