This activity shows students how to make a simple pinhole constellation projector from a paper cup.
After they've explored these popular shapes in the night sky, students can create their own pattern, and tell the story that inspired it!


Using paper drinking cups, our pre-made patterns, and a push-pin, you can make your very own constellations!
This activity shows students how to make a simple pinhole constellation projector from a paper cup.
After they've explored these popular shapes in the night sky, students can create their own pattern, and tell the story that inspired it!
Create Your Own Star Patterns
People throughout time have used the night sky to tell stories, imagining heroes, monsters, objects, and animals in the patterns of the stars. Using this star pattern or this other star pattern (or both!), draw lines to connect the stars below to make your own pattern. Then, use the back of the sheet to write its story.
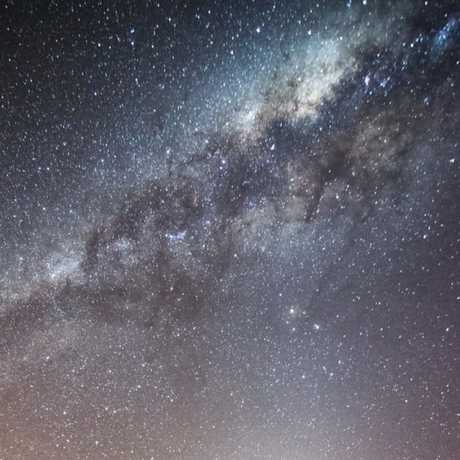
ave you ever looked up at the stars at night and wondered how you're supposed to find your way around them? Thousands of years ago, people recognized that the patterns formed by the stars are fixed and unchanging and that different star-patterns are visible during different seasons.
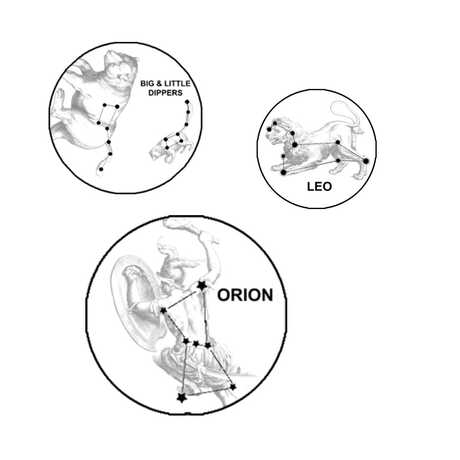
Some of the older and more famous star patterns are called constellations. Some of these are named after figures from ancient legend and folklore because their shapes resemble (or at least suggest) those figures, such as Leo the Lion, Orion the Hunter, or Scorpius the Scorpion. Other star patterns are harder to imagine—especially when observed from the interfering glow of city lights, which washes fainter stars from view. However, you can imagine simple, recognizable shapes formed only by the brightest stars. These are called asterisms and can be as simple as a triangle, a square, or an arc...or they can be slightly more complex but still-recognizable figures such as a hexagon or an hourglass.
Each season has a characteristic set of asterisms that can be seen at night. For example, in the Springtime, we can see the famous Big Dipper high in the sky. The Big Dipper itself is an asterism formed by the brightest stars in the much larger constellation Ursa Major the Great Bear, which includes many faint stars that are more difficult to see. The Big Dipper's handle is curved, forming an arc. You can follow the curve of this arc and extend it to a right star that has the word "arc" in its name—Arcturus (ark-TOO-rǝs) in Boötes (bo-OH-teez) the Herdsman. Continue the curve southward to another bright star, Spica (SPY-kuh) in Virgo the Maiden. A popular mnemonic that many stargazers use to remember this is "Follow the arc to Arcturus, then speed on to Spica." And there are lots of other asterisms that can be seen in the Spring sky. Leo the Lion, just beneath the Big Dipper, is formed by two smaller shapes: a backward question-mark (or sickle) and a small right-triangle. Arcturus and Spica, along with the fainter star that represents the tip of the tail of Leo, form a large, nearly-equilateral triangle called, appropriately enough, the Spring Triangle. As you can see, some of these asterisms overlap, and that's fine. You don't have to learn all of them—just whatever helps you feel more comfortable with the stars.
Here are a few asterisms to look for during other seasons (there are many others, but we'll stick to the easiest ones to find):
Summer:
The Summer Triangle, formed by the stars Vega in Lyra the Harp, Altair in Aquila the Eagle, and Deneb in Cygnus the Swan (Cygnus is also known as the Northern Cross)
Scorpius the Scorpion, which really does look like its namesake (although Polynesians call it Maui's Fishhook)
The teakettle in Sagittarius the Archer
Fall:
The Great Square in Pegasus the Flying Horse (appropriately-enough for the fall, some also call it a baseball diamond)
The "W" of Cassiopeia the Queen
Winter:
The hourglass that forms most of Orion the Hunter, highlighted by the three stars in a row that represent Orion's Belt
Surrounding Orion is the Winter Hexagon, formed by the brightest stars in six different constellations
By starting with the more prominent asterisms, beginning stargazers can acquaint themselves with the simpler figures first and use them as road-maps to find fainter and more challenging star groups, such as the individual constellations to which the bright stars belong. For example, use the "pointer" stars in the bowl of the Big Dipper to find the North Star, and from there, see if you can identify the stars of the Little Dipper. Or when you find the Summer Triangle, look for the figure of Cygnus the Swan or the Northern Cross. As your familiarity grows, your knowledge of the stars will gradually expand to include more and more asterisms and constellations.
The constellations we recognize today were imagined hundreds—or, in some cases, thousands—of years ago, and different cultures had their own interpretations of the pictures among the stars. In the 1600s, a Polish astronomer named Johannes Hevelius ((hǝ-VEE-lee-ǝs) published an atlas of the northern sky listing 56 constellations, illustrated with his artistic interpretations of them. Some of these are used in our Paper Cup Planetarium activity to help you imagine what the star patterns are traditionally supposed to represent.
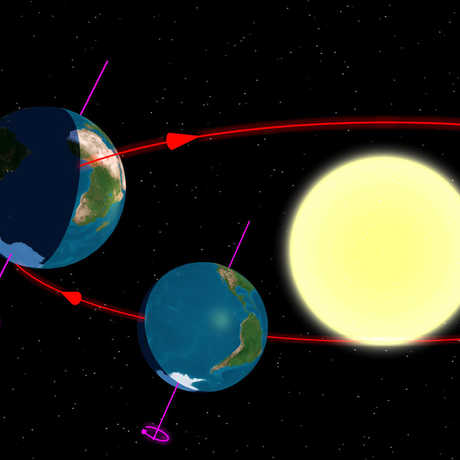
The Earth's tilt is the reason for the season!
You may know your zodiac sign, but do you know your birthday stars?
How much of outer space is just space?